# Fields
- Defining Fields
- Showing / Hiding Fields
- Dynamic Field Methods
- Default Values
- Field Placeholder Text
- Field Panels
- Sortable Fields
- Field Types
- Avatar Field
- Badge Field
- Boolean Field
- Boolean Group Field
- Code Field
- Country Field
- Currency Field
- Date Field
- DateTime Field
- File Field
- Gravatar Field
- Heading Field
- Hidden Field
- ID Field
- Image Field
- KeyValue Field
- Markdown Field
- Number Field
- Password Field
- Password Confirmation Field
- Place Field
- Select Field
- Slug Field
- Sparkline Field
- Status Field
- Stack Field
- Text Field
- Textarea Field
- Timezone Field
- Trix Field
- Vapor File Field
- Vapor Image Field
- Computed Fields
- Customization
# Defining Fields
Each Nova resource contains a fields method. This method returns an array of fields, which generally extend the Laravel\Nova\Fields\Field class. Nova ships with a variety of fields out of the box, including fields for text inputs, booleans, dates, file uploads, Markdown, and more.
To add a field to a resource, we can simply add it to the resource's fields method. Typically, fields may be created using their static make method. This method accepts several arguments; however, you usually only need to pass the "human readable" name of the field. Nova will automatically "snake case" this string to determine the underlying database column:
use Laravel\Nova\Fields\ID;
use Laravel\Nova\Fields\Text;

/**
 * Get the fields displayed by the resource.
 *
 * @param  \Illuminate\Http\Request  $request
 * @return array
 */
public function fields(Request $request)
{
    return [
        ID::make()->sortable(),
        Text::make('Name')->sortable(),
    ];
}
# Field Column Conventions
As noted above, Nova will "snake case" the displayable name of the field to determine the underlying database column. However, if necessary, you may pass the column name as the second argument to the field's make method:
Text::make('Name', 'name_column'),
# Showing / Hiding Fields
Often, you will only want to display a field in certain situations. For example, there is typically no need to show a Password field on a resource index listing. Likewise, you may wish to only display a Created At field on the creation / update forms. Nova makes it a breeze to hide / show fields on certain screens.
The following methods may be used to show / hide fields based on the display context:
showOnIndexshowOnDetailshowOnCreatingshowOnUpdatinghideFromIndexhideFromDetailhideWhenCreatinghideWhenUpdatingonlyOnIndexonlyOnDetailonlyOnFormsexceptOnForms
You may chain any of these methods onto your field's definition in order to instruct Nova where the field should be displayed:
Text::make('Name')->hideFromIndex(),
Alternatively, you may pass a callback to the following methods.
showOnIndexshowOnDetailshowOnCreatingshowOnUpdatinghideFromIndexhideFromDetailhideWhenCreatinghideWhenUpdating
For show* methods, the field will be displayed if the given callback returns true:
Text::make('Name')->showOnIndex(function () {
    return $this->name === 'Taylor Otwell';
}),
For hide* methods, the field will be hidden if the given callback returns true:
Text::make('Name')->hideFromIndex(function () {
    return $this->name === 'Taylor Otwell';
}),
# Dynamic Field Methods
If your application requires it, you may specify a separate list of fields for specific display contexts. For example, imagine you have a resource with the following list of fields:
public function fields(NovaRequest $request)
{
    return [
        Text::make('First Name'),
        Text::make('Last Name'),
        Text::make('Job Title'),
    ];
}
On your detail page, you may wish to show a combined name, followed by the job title. In order to do this, you could add a fieldsForDetail method which returns a separate list of fields:
public function fieldsForDetail(NovaRequest $request)
{
    return [
        Text::make('Name', function () {
            return sprintf('%s %s', $this->first_name, $this->last_name);
        }),

        Text::make('Job Title'),
    ];
}
The available methods for individual display contexts are:
fieldsForIndexfieldsForDetailfieldsForCreatefieldsForUpdate
Dynamic Field Methods Precedence ::
The fieldsForIndex, fieldsForDetail, fieldsForCreate, and fieldsForUpdate methods always take precedence over the fields method.
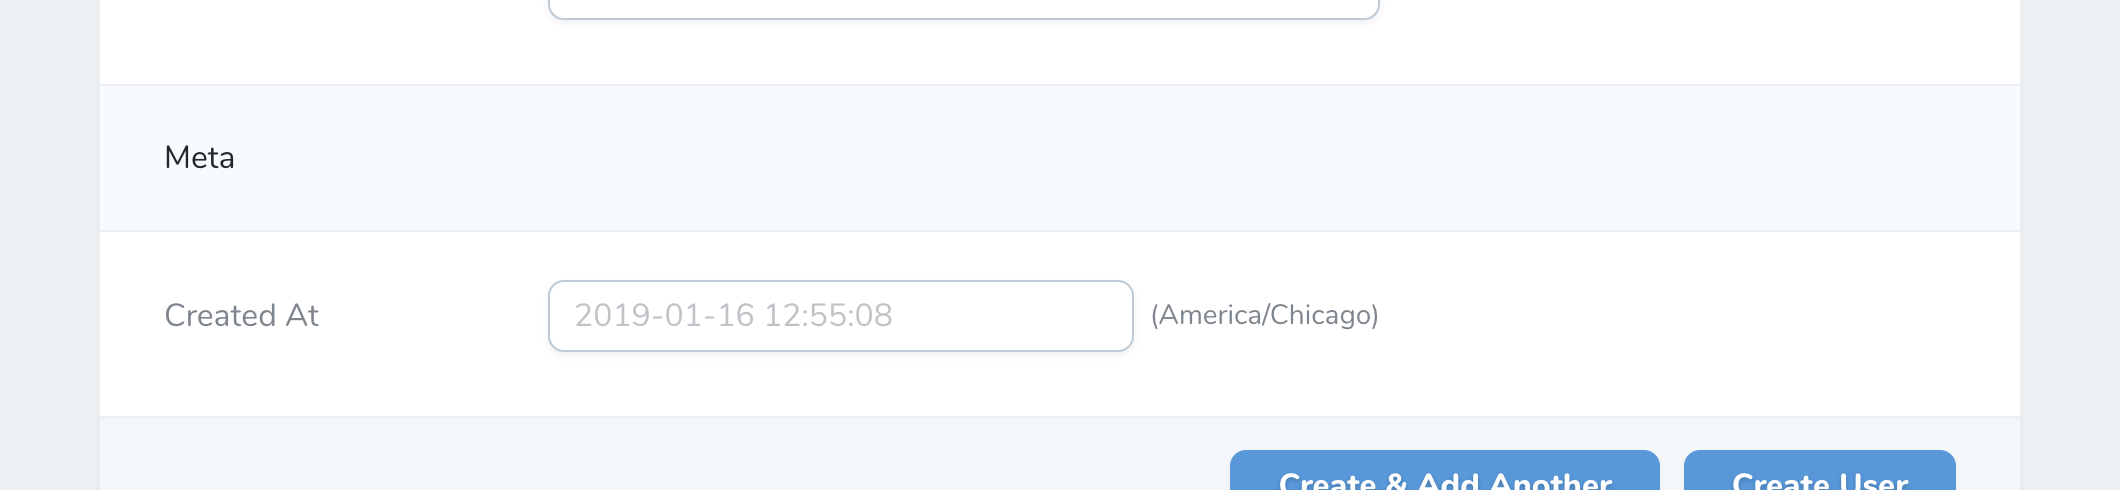
# Default Values
There are time you may wish to provide a default value to your fields. Nova enables this using the default method, which accepts a value or callback, which will be run when serializing fields for the create view:
BelongsTo::make('Name')->default($request->user()->getKey()),

Text::make('Uuid')->default(function ($request) {
    return Str::orderedUuid();
}),
# Field Placeholder Text
By default, the placeholder text of a field will be it's name. You can override the placeholder text of a field that supports it by using the placeholder method:
Text::make('Name')->placeholder('My New Post'),
# Field Panels
If your resource contains many fields, your resource "detail" screen can become crowded. For that reason, you may choose to break up groups of fields into their own "panels":
You may do this by creating a new Panel instance within the fields method of a resource. Each panel requires a name and an array of fields that belong to that panel:
use Laravel\Nova\Panel;

/**
 * Get the fields displayed by the resource.
 *
 * @param  \Illuminate\Http\Request  $request
 * @return array
 */
public function fields(Request $request)
{
    return [
        ID::make()->sortable(),

        new Panel('Address Information', $this->addressFields()),
    ];
}

/**
 * Get the address fields for the resource.
 *
 * @return array
 */
protected function addressFields()
{
    return [
        Place::make('Address', 'address_line_1')->hideFromIndex(),
        Text::make('Address Line 2')->hideFromIndex(),
        Text::make('City')->hideFromIndex(),
        Text::make('State')->hideFromIndex(),
        Text::make('Postal Code')->hideFromIndex(),
        Country::make('Country')->hideFromIndex(),
    ];
}
You may limit the amount of fields shown in a panel by using the limit method:
(new Panel('Profile', [
    Text::make('Full Name'),
    Date::make('Date of Birth'),
    Text::make('Place of Birth'),
]))->limit(1),
Panels with a limit set will display a Show All Fields button which shows all fields when clicked.
# Sortable Fields
When attaching a field to a resource, you may use the sortable method to indicate that the resource index may be sorted by the given field:
Text::make('Name', 'name_column')->sortable(),
# Field Types
Relationship Fields
This portion of the documentation only discusses non-relationship fields. To learn more about relationship fields, check out their documentation.
Nova ships with a variety of field types. So, let's explore all of the available types and their options:
- Avatar
- Badge
- Boolean
- Boolean Group
- Code
- Country
- Currency
- Date
- DateTime
- File
- Gravatar
- Heading
- ID
- Image
- KeyValue
- Markdown
- Number
- Password
- Place
- Select
- Sparkline
- Status
- Stack
- Text
- Textarea
- Timezone
- Trix
# Avatar Field
The Avatar field extends the Image field and accepts the same options and configuration:
use Laravel\Nova\Fields\Avatar;

Avatar::make('Avatar'),
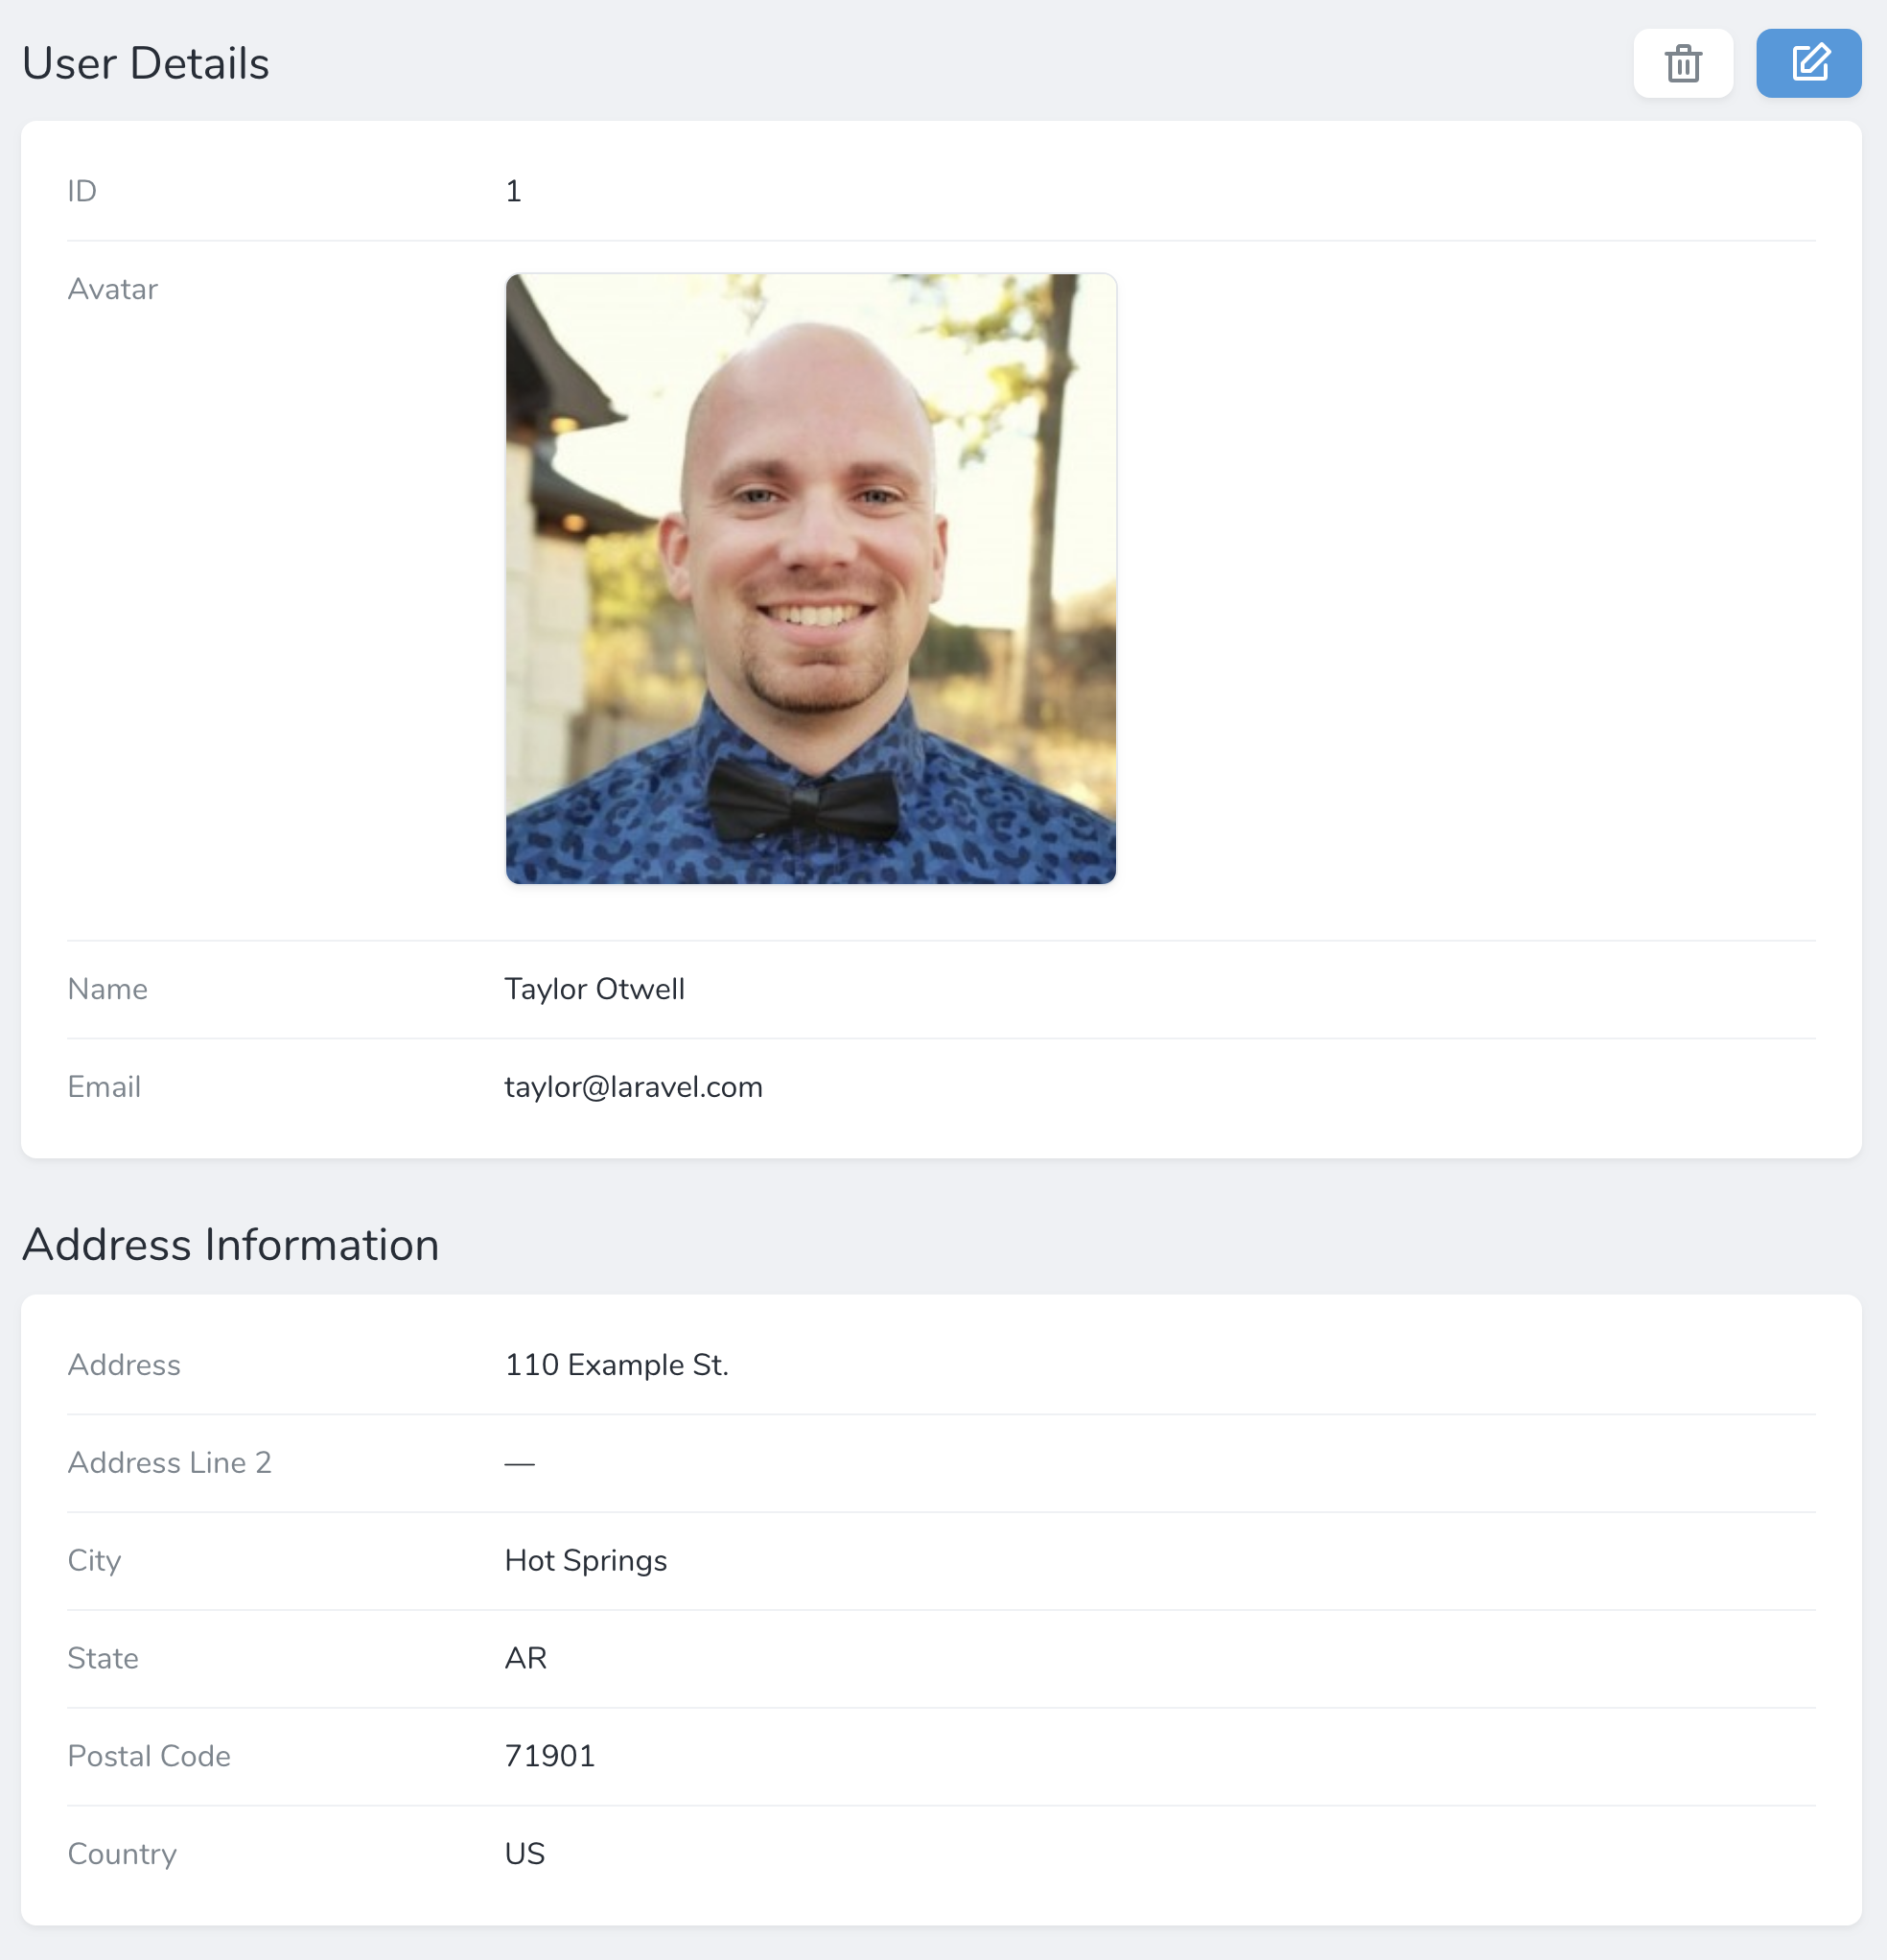
If a resource contains an Avatar field, that field will be displayed next to the resource's title when the resource is displayed in search results:
![]()
You may use the squared method to display the image's thumbnail with squared edges. Additionally, you may use the rounded method to display its thumbnails with fully-rounded edges.
# Badge Field
The Badge field can be used to display the status of a Resource in the index and detail views:
use Laravel\Nova\Fields\Badge;

Badge::make('Status', function () {
    return User::statuses[$this->status];
}),
By default, the Badge field supports four Resource values: info, success, danger and warning; however, you can override this mapping by passing an associative array of your Resource types to the built-in types:
Badge::make('Status')->map([
    'draft' => 'danger',
    'published' => 'success',
]),
You can also use types to completely replace the built-in types and their associate CSS classes:
Badge::make('Status')->types([
    'draft' => 'custom classes', // Classes can be a string
    'published' => ['custom', 'class'] // Classes can also be an array
]),
To supplement the built-in types you may use the addTypes method:
Badge::make('Status')->addTypes([
    'draft' => 'custom classes',
]),
By default the Badge field is not shown on the edit or update views. If you wish to modify the value represented by the Badge field on your edit forms, use another field in combination with the onlyOnForms field option.
# Boolean Field
The Boolean field may be used to represent a boolean / "tiny integer" column in your database. For example, assuming your database has a boolean column named active, you may attach a Boolean field to your resource like so:
use Laravel\Nova\Fields\Boolean;

Boolean::make('Active'),
# Customizing True / False Values
If you are using values other than true, false, 1, or 0 to represent "true" and "false", you may instruct Nova to use the custom values recognized by your application. To accomplish this, chain the trueValue and falseValue methods onto your field's definition:
Boolean::make('Active')
    ->trueValue('On')
    ->falseValue('Off'),
# Boolean Group Field
The BooleanGroup field may be used to group a set of Boolean checkboxes, which are eventually stored as JSON key-values in the database column they represent. You may create a BooleanGroup field by passing in a set of keys and labels for each option:
BooleanGroup::make('Permissions')->options([
    'create' => 'Create',
    'read' => 'Read',
    'update' => 'Update',
    'delete' => 'Delete',
]),
The user will be presented with a grouped set of checkboxes which, when saved, will be converted to JSON format:
{
  "create": true,
  "read": false,
  "update": false,
  "delete": false
}
You may wish to filter out values that are either true or false from display to avoid cluttering up the view. You may do this by using the hideFalseValues andhideTrueValues` methods on the field:
BooleanGroup::make('Permissions')->options([
    'create' => 'Create',
    'read' => 'Read',
    'update' => 'Update',
    'delete' => 'Delete',
])->hideFalseValues(),

BooleanGroup::make('Permissions')->options([
    'create' => 'Create',
    'read' => 'Read',
    'update' => 'Update',
    'delete' => 'Delete',
])->hideTrueValues(),
In the event that the field contains no values, Nova will display "No Data". You may customize this text using the noValueText method:
BooleanGroup::make('Permissions')->options([
    'create' => 'Create',
    'read' => 'Read',
    'update' => 'Update',
    'delete' => 'Delete',
])->noValueText('No permissions selected.'),
# Code Field
The Code fields provides a beautiful code editor within your Nova administration panel. Generally, code fields should be attached to TEXT database columns. However, you may also attach them to JSON database columns:
use Laravel\Nova\Fields\Code;

Code::make('Snippet'),
Code Fields On The Index
By default, Nova will never display a Code field on a resource index listing.
# Editing JSON
If you intend to use a given Code field instance to only edit JSON, you may chain the json method onto your field definition:
Code::make('Options')->json(),
Code field JSON validation
Note: Nova does not apply the json validation for Code fields automatically. It's up to the user to specify this rule.
# Syntax Highlighting
You may customize the language syntax highlighting of the Code field using the language method:
Code::make('Snippet')->language('php'),
The Code field's currently supported languages are:
dockerfilejavascriptmarkdownnginxphprubysassshellvuexmlyaml
# Country Field
The Country field generates a Select field containing a list of the world's countries. The field will store the country's two-letter code:
use Laravel\Nova\Fields\Country;

Country::make('Country', 'country_code'),
# Currency Field
Currency Field Versioning
This documentation refers to the Currency field from v2.11.0 onwards. Prior to this, the field was incompatible with PHP 7.4.
The Currency field generates a Number field that is automatically formatted using brick/money. Nova will use USD as the default currency however, this can be changed by modifiying the nova.currency value.
use Laravel\Nova\Fields\Currency;

Currency::make('Price'),
You may override the currency per-field by using the currency method:
Currency::make('Price')->currency('EUR'),
The field is formatted by default to the locale found in app.locale. You can override this by providing a locale code:
Currency::make('Price')->locale('fr'),
# Date Field
The Date field may be used to store a date value (without time). For more information about dates and timezones within Nova, check out the additional date / timezone documentation:
use Laravel\Nova\Fields\Date;

Date::make('Birthday'),
# Date Formats
You may customize the display format of your Date fields using the format method. The format must be a format supported by Moment.js (opens new window):
Date::make('Birthday')->format('DD MMM'),
To customize the display format used for the JavaScript date picker widget, you can use the pickerFormat method:
Date::make('Birthday')->pickerFormat('d.m.Y'),
To learn about the available options, you may see the flatpickr reference here: https://flatpickr.js.org/formatting/ (opens new window).
# Customize First Day Of Week
You can customize the first day of the week using the firstDayOfWeek method:
Date::make('Birthday')->firstDayOfWeek(1), // First day of the week is Monday
# DateTime Field
The DateTime field may be used to store a date-time value. For more information about dates and timezones within Nova, check out the additional date / timezone documentation:
use Laravel\Nova\Fields\DateTime;

DateTime::make('Updated At')->hideFromIndex(),
You may customize the display format of your DateTime fields using the format method. The format must be a format supported by Moment.js (opens new window):
DateTime::make('Created At')->format('DD MMM YYYY'),
To customize the display format used for the JavaScript date picker widget, you can use the pickerFormat method:
DateTime::make('Updated At')->pickerFormat('d.m.Y'),
To learn about the available options, you may see the flatpickr reference here: https://flatpickr.js.org/formatting/ (opens new window).
# File Field
To learn more about defining file fields and handling uploads, check out the additional file field documentation.
use Laravel\Nova\Fields\File;

File::make('Attachment'),
# Gravatar Field
The Gravatar field does not correspond to any column in your application's database. Instead, it will display the "Gravatar" image of the model it is associated with.
By default, the Gravatar URL will be generated based on the value of the model's email column. However, if your user's email addresses are not stored in the email column, you may pass a custom column name to the field's make method:
use Laravel\Nova\Fields\Gravatar;

// Using the "email" column...
Gravatar::make(),

// Using the "email_address" column...
Gravatar::make('Avatar', 'email_address'),
You may use the squared method to display the image's thumbnail with squared edges. Additionally, you may use the rounded method to display its thumbnails with fully-rounded edges.
# Heading Field
The Heading field does not correspond to any column in your application's database. It is used to display a banner across your forms and can function as a separator for long lists of fields:
Heading::make('Meta'),
If you need to render HTML content within the Heading field, use the asHtml method:
Heading::make('<p class="text-danger">* All fields are required.</p>')->asHtml(),
Headings And Indexes
Heading fields are automatically hidden from the resource index screen.
# Hidden Field
The Hidden field allows users to pass a value in a hidden text input. You may use this to pass any value that doesn't need to be changed by the user but is required for saving the resource:
Hidden::make('Slug'),
Hidden::make('Slug')->default(Str::random(64)),
Combined with Default Values, Hidden fields are useful for passing things like related ID's to your forms:
Hidden::make('User', 'user_id')->default(function ($request) {
    return $request->user()->id;
}),
# ID Field
The ID field represents the primary key of your resource's database table. Typically, each Nova resource you define should contain an ID field. By default, the ID field assumes the underlying database column is named id:
use Laravel\Nova\Fields\ID;

// Using the "id" column...
ID::make(),

// Using the "id_column" column...
ID::make('ID', 'id_column'),

// Resolve BIGINT ID fields
ID::make()->asBigInt(),
# Image Field
The Image field extends the File field and accepts the same options and configurations. The Image field, unlike the File field, will display a thumbnail preview of the underlying image when viewing the resource:
use Laravel\Nova\Fields\Image;

Image::make('Photo'),
By default, the Image field allows the user to download the linked file. To disable this you can use the disableDownload method on the field definition:
Image::make('Photo')->disableDownload(),
You may use the squared method to display the image's thumbnail with squared edges. Additionally, you may use the rounded method to display its thumbnails with fully-rounded edges.
File Fields
To learn more about defining file fields and handling uploads, check out the additional file field documentation.
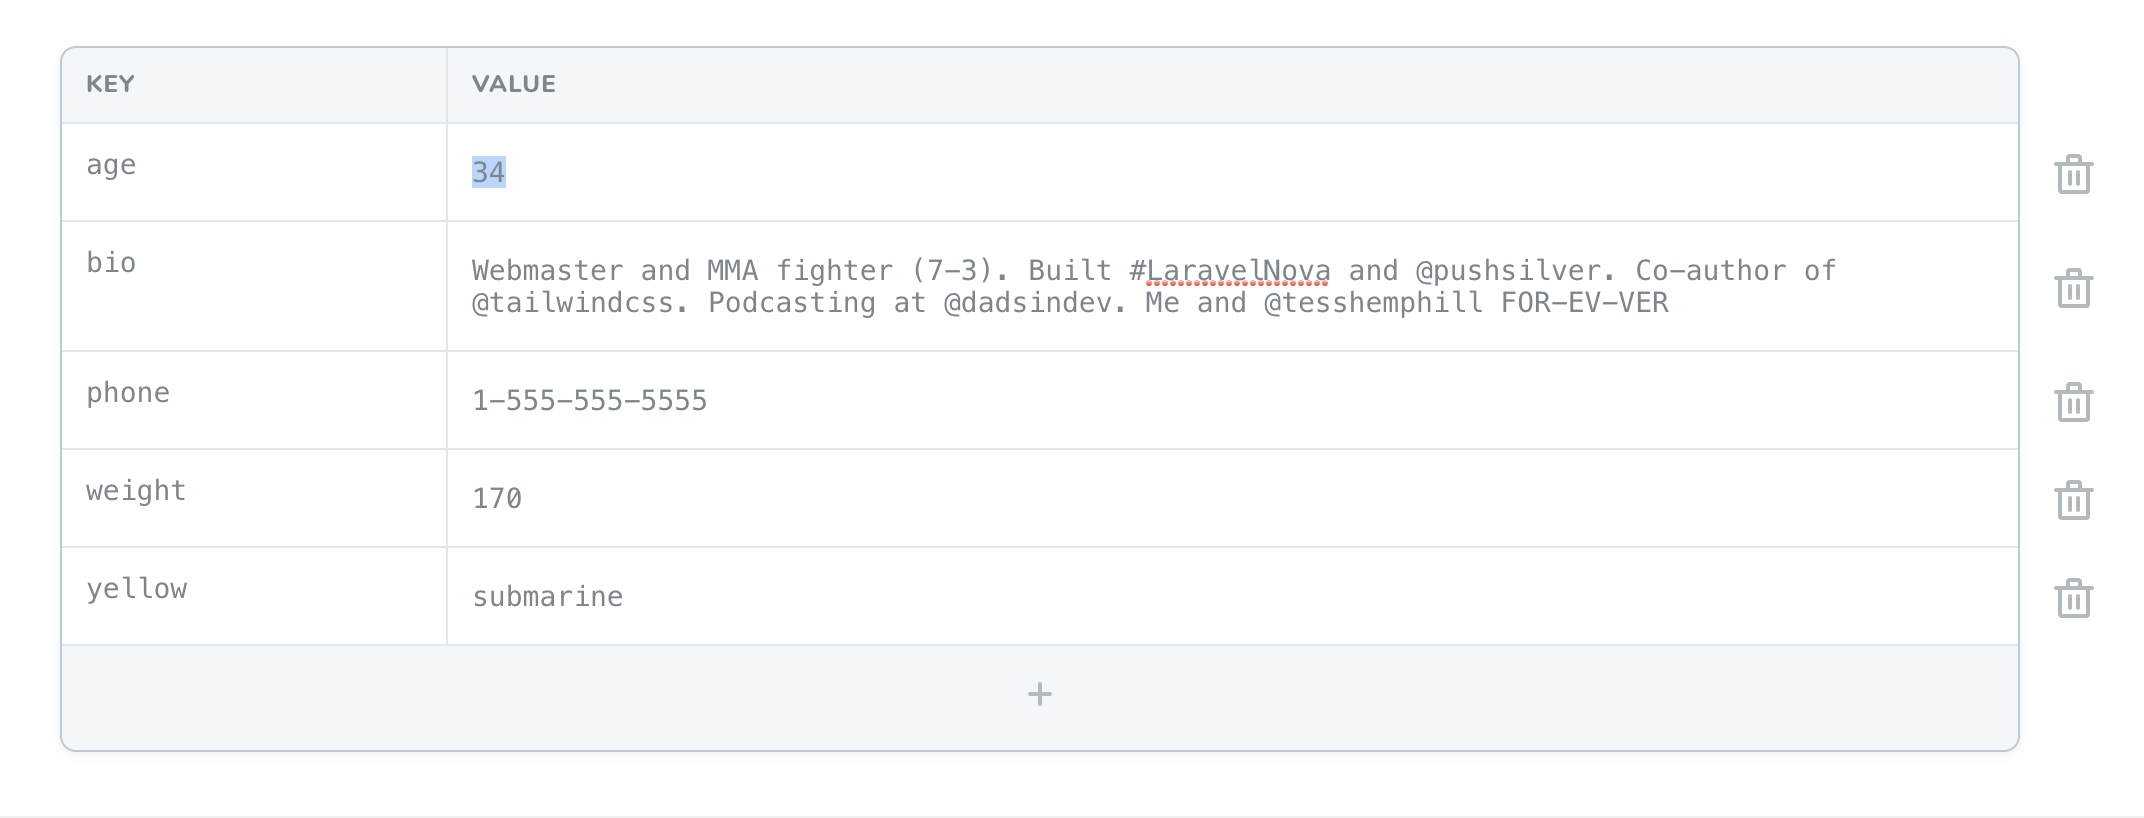
# KeyValue Field
The KeyValue field provides a convenient interface to edit flat, key-value data stored inside JSON column types. For example, you may store profile information inside a JSON column type name (opens new window) meta:
use Laravel\Nova\Fields\KeyValue;

KeyValue::make('Meta')->rules('json'),
This would give you an interface similar to this:
# Customizing KeyValue Labels
You can customize the text values used in the component by specifying the keyLabel, valueLabel, and actionText methods when defining the field:
KeyValue::make('Meta')
    ->keyLabel('Item') // Customize the key heading
    ->valueLabel('Label') // Customize the value heading
    ->actionText('Add Item'), // Customize the "add row" button text
KeyValue Fields On The Index
By default, Nova will never display a KeyValue field on a resource index listing.
If you would like to disable the user's ability to edit the keys of the field, you may use the disableEditingKeys method to accomplish this:
KeyValue::make('Meta')
    ->disableEditingKeys()
Disabling Editing KeyValue Keys
Disabling editing keys with the disableEditingKeys method will automatically disable adding rows as well.
You may also remove the user's ability to add new rows to the field by chaining the disableAddingRows method:
KeyValue::make('Meta')
    ->disableAddingRows()
In addition you may also wish to remove the user's ability to delete exisiting rows in the field by using the disableDeletingRows method:
KeyValue::make('Meta')
    ->disableDeletingRows()
# Markdown Field
The Markdown field provides a WYSIWYG Markdown editor for its associated field. Typically, this field will correspond to a TEXT column in your database. The Markdown field will store the raw Markdown text within the associated database column:
use Laravel\Nova\Fields\Markdown;

Markdown::make('Biography'),
By default, Markdown fields will not display their content when viewing a resource on its detail page. It will be hidden behind a "Show Content" link, that when clicked will reveal the content. You may specify the Markdown field should always display its content by calling the alwaysShow method on the field itself:
Markdown::make('Biography')->alwaysShow(),
# Number Field
The Number field provides an input control with a type attribute of number:
use Laravel\Nova\Fields\Number;

Number::make('price'),
You may use the min, max, and step methods to set their corresponding attributes on the generated input control:
Number::make('price')->min(1)->max(1000)->step(0.01),
# Password Field
The Password field provides an input control with a type attribute of password:
use Laravel\Nova\Fields\Password;

Password::make('Password'),
The Password field will automatically preserve the password that is currently stored in the database if the incoming password field is empty. Therefore, a typical password field definition might look like the following:
Password::make('Password')
    ->onlyOnForms()
    ->creationRules('required', 'string', 'min:6')
    ->updateRules('nullable', 'string', 'min:6'),
# Password Confirmation Field
The PasswordConfirmation field provides an input that can be used for confirming another Password field. This field will only be shown on forms:
PasswordConfirmation::make('Password Confirmation'),
# Place Field
The Place field leverages the power of the Algolia Places API (opens new window) to provide ultra-fast address searching and auto-completion. An Algolia account is not required in order to leverage this field.
Typically, a Place field will be defined alongside other related address fields. In this example, in order to keep our resource tidy, we will use the merge method to extract the address field definitions into their own method:
use Laravel\Nova\Fields\Place;

/**
 * Get the fields displayed by the resource.
 *
 * @param  \Illuminate\Http\Request  $request
 * @return array
 */
public function fields(Request $request)
{
    return [
        ID::make()->sortable(),
        $this->addressFields(),
    ];
}

/**
 * Get the address fields for the resource.
 *
 * @return \Illuminate\Http\Resources\MergeValue
 */
protected function addressFields()
{
    return $this->merge([
        Place::make('Address', 'address_line_1')->hideFromIndex(),
        Text::make('Address Line 2')->hideFromIndex(),
        Text::make('City')->hideFromIndex(),
        Text::make('State')->hideFromIndex(),
        Text::make('Postal Code')->hideFromIndex(),
        Text::make('Suburb')->hideFromIndex(),
        Country::make('Country')->hideFromIndex(),
        Text::make('Latitude')->hideFromIndex(),
        Text::make('Longitude')->hideFromIndex(),
    ]);
}
# Searchable Countries
By default, the Place field will search all addresses around the world. If you would like to limit the countries included in the search, you may use the countries method:
Place::make('Address', 'address_line_1')->countries(['US', 'CA']),
# City Search
If you intend to use the Place field to search for cities instead of addresses, you may use the onlyCities method to instruct the field to only list cities in its results:
Place::make('City')->onlyCities(),
City Auto-Completion
When using the Place field as a city search, the state and country fields will still receive auto-completion. However, the postal_code field will not.
# Configuring Field Auto-Completion
By default, the place field will auto-complete the associated address fields based on their field names. The Place field will automatically fill fields named address_line_2, city, state, postal_code, suburb, country, latitude and longitude. However, you may customize the field names that should be auto-completed using the following methods:
secondAddressLine($column)city($column)state($column)postalCode($column)suburb($column)country($column)
For example:
Place::make('Address', 'address_line_1')
    ->secondAddressLine('address_2')
    ->city('city_name')
    ->state('state_code')
    ->postalCode('zip_code')
    ->suburb('suburb')
    ->country('country_code')
    ->latitude('latitude')
    ->longitude('longitude'),
# Select Field
The Select field may be used to generate a drop-down select menu. The select menu's options may be defined using the options method:
use Laravel\Nova\Fields\Select;

Select::make('Size')->options([
    'S' => 'Small',
    'M' => 'Medium',
    'L' => 'Large',
]),
On the resource index and detail screens, the Select field's "key" value will be displayed. If you would like to display the labels instead, you may use the displayUsingLabels method:
Select::make('Size')->options([
    'S' => 'Small',
    'M' => 'Medium',
    'L' => 'Large',
])->displayUsingLabels(),
You may also display select options in groups:
Select::make('Size')->options([
    'MS' => ['label' => 'Small', 'group' => 'Men Sizes'],
    'MM' => ['label' => 'Medium', 'group' => 'Men Sizes'],
    'WS' => ['label' => 'Small', 'group' => 'Women Sizes'],
    'WM' => ['label' => 'Medium', 'group' => 'Women Sizes'],
])->displayUsingLabels(),
If your options are dynamically generated you may pass a Closure:
Select::make('Size')->options(function () {
    return array_filter([
        Size::SMALL => Size::MAX_SIZE === SIZE_SMALL ? 'Small' : null,
        Size::MEDIUM => Size::MAX_SIZE === SIZE_MEDIUM ? 'Medium' : null,
        Size::LARGE => Size::MAX_SIZE === SIZE_LARGE ? 'Large' : null,
    ]);
}),
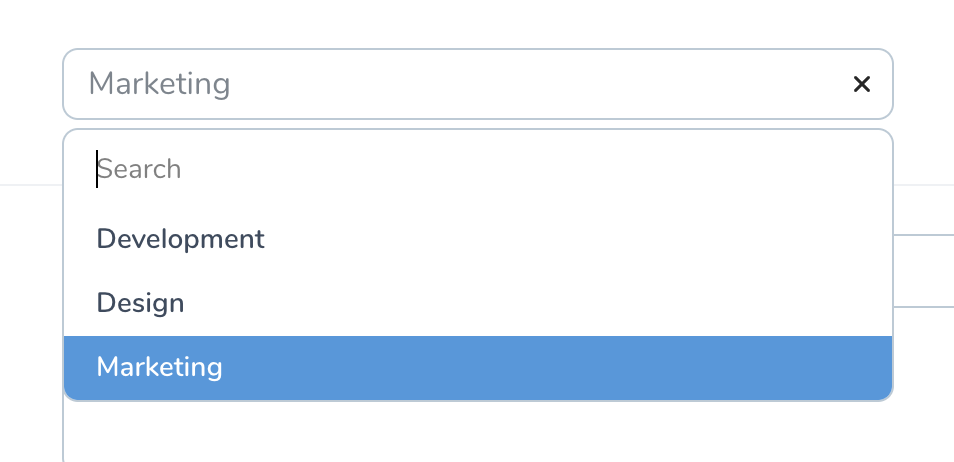
# Searchable Select Fields
At times it's convenient to be able to search or filter the list of options in a Select field. You can enable this by calling the searchable method on the field:
Select::make('Size')->searchable()->options([
    'S' => 'Small',
    'M' => 'Medium',
    'L' => 'Large',
])->displayUsingLabels(),
When using this field, Nova will display an input field which allows you to filter the list based on its label:
# Slug Field
Some times you may need a unique, human-readable identifier generated from another field in your Nova resource for use in URLs. You can automatically generate these URL "slugs" with the Slug field:
Slug::make('Slug')->from('Title'),
By default, the field will take a string like 'My Cool Post' and create a slug like 'my-cool-post'. If you'd like the field to use underscores instead of dashes, use the separator method:
Slug::make('Slug')->from('Title')->separator('_'),
# Sparkline Field
The Sparkline field may be used to display a small chart within a resource. The data displayed within a Sparkline can be an array, a callable (returning an array), or an instance of a Trend metric class:
// Using an array...
Sparkline::make('Post Views')->data([1, 2, 3, 4, 5, 6, 7, 8, 9, 10]),

// Using a callable...
Sparkline::make('Post Views')->data(function () {
    return json_decode($this->views_data);
}),

// Using a Trend instance...
Sparkline::make('Post Views')->data(new PostViewsOverTime($this->id)),
# Using Trend Metrics
If your Sparkline contains complicated data, you may leverage your existing Trend metrics:
Sparkline::make('Post Views')->data(new PostViewsOverTime($this->id)),
Note that in the example above, we're passing through a value to the metric class. This value will become the resourceId parameter within the Metric class. In the example PostViewsOverTime class, we can access this value via $request->resourceId:
return $this->countByDays(
    $request,
    PostView::where('post_id', '=', $request->resourceId)
);
Default Ranges
A Sparkline will always use the first range defined in the ranges method of a Trend.
# Customizing The Chart
If a bar chart is better suited to your data, you may use the asBarChart() method:
Sparkline::make('Post Views')
           ->data([1, 2, 3, 4, 5, 6, 7, 8, 9, 10])
           ->asBarChart(),
By default, a Sparkline will appear on the detail view. You can customize the dimensions of the chart using the height and width methods:
Sparkline::make('Post Views')
           ->data([1, 2, 3, 4, 5, 6, 7, 8, 9, 10])
           ->height(200)
           ->width(600),
# Status Field
The Status field may be used to display a "progress state" column. Internally, Nova uses the Status field to indicate the current state (waiting, running, or finished) of queued actions. However, you are free to use this field for your own purposes as needed:
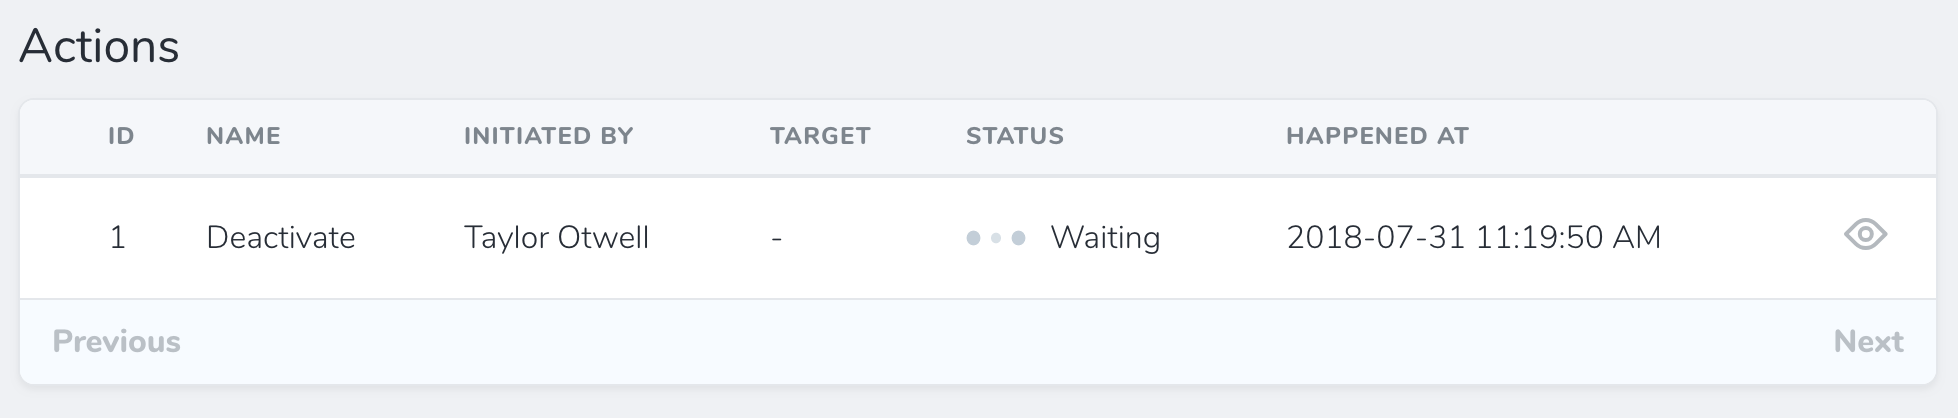
The loadingWhen and failedWhen methods may be used to instruct the field which words indicate a "loading" state and which words indicate a "failed" state. In this example, we will indicate that database column values of waiting or running should display a "loading" indicator:
use Laravel\Nova\Fields\Status;

Status::make('Status')
    ->loadingWhen(['waiting', 'running'])
    ->failedWhen(['failed']),
# Stack Field
As you resource classes grow, you may find it useful to be able to group fields together to simplify your index and detail views. A Stack field allows one to display fields like BelongsTo, Text, and others in vertical orientation:
Stack::make('Details', [
    Text::make('Name'),
    Text::make('Slug')->resolveUsing(function () {
        return Str::slug(optional($this->resource)->name);
    }),
]),
Stack fields are not shown on forms, and are only for stacking lines of text for display on the index and detail resource views.
# Line Fields
To gain more control over how the individual fields in a Stack are displayed, you can opt to use the special Line field, which provides methods for controlling the display of the line. Line fields supports the following presentational methods:
asHeadingasSubTitleasSmallasBase
In addition to Lines presentational methods, you may also pass any additional classes to the field to increase the visual customization of the Line:
Stack::make('Details', [
    Line::make('Title')->extraClasses('italic font-medium text-80'),
]),
# Passing Closures to Line Fields
In addition to passing normal BelongsTo, Text and Line fields to the Stack field, you may also pass a Closure, which will automatically get converted to a Line instance:
Stack::make('Details', [
    Line::make('Name')->asHeading(),
    function () {
        return optional($this->resource)->position;
    }
]),
# Text Field
The Text field provides an input control with a type attribute of text:
use Laravel\Nova\Fields\Text;

Text::make('Name'),
Text fields may be customized further by setting any attribute on the field. This can be done by calling the withMeta methods and passing in a valid extraAttributes value:
Text::make('Name')->withMeta([
    'extraAttributes' => [
        'placeholder' => 'David Hemphill',
    ],
]),
# Text Field Suggestions
If you'd like to offer users of your Text field a list of suggestions when typing into the field, you may use the suggestions method to return an array of suggestions, which will be used to populate a datalist:

# Formatting Text As Links
To format text as a link, you may use the asHtml method:
Text::make('Twitter Profile', function () {
    $username = $this->twitterUsername;

    return "<a href='https://twitter.com/{$username}'>@{$username}</a>";
})->asHtml(),
# Textarea Field
The Textarea field provides a textarea control:
use Laravel\Nova\Fields\Textarea;

Textarea::make('Biography'),
By default, Textarea fields will not display their content when viewing a resource on its detail page. It will be hidden behind a "Show Content" link, that when clicked will reveal the content. You may specify the Textarea field should always display its content by calling the alwaysShow method on the field itself:
Textarea::make('Biography')->alwaysShow(),
You may also specify the textarea's height by calling the rows method on the field:
Textarea::make('Excerpt')->rows(3),
Textarea fields may be customized further by setting any attribute on the field. This can be done by calling the withMeta methods and passing in a valid extraAttributes value:
Textarea::make('Excerpt')->withMeta(['extraAttributes' => [
    'placeholder' => 'Make it less than 50 characters']
]),
# Timezone Field
The Timezone field generates a Select field containing a list of the world's timezones:
use Laravel\Nova\Fields\Timezone;

Timezone::make('Timezone'),
# Trix Field
The Trix field provides a Trix editor (opens new window) for its associated field. Typically, this field will correspond to a TEXT column in your database. The Trix field will store its corresponding HTML within the associated database column:
use Laravel\Nova\Fields\Trix;

Trix::make('Biography'),
By default, Trix fields will not display their content when viewing a resource on its detail page. It will be hidden behind a "Show Content" link, that when clicked will reveal the content. You may specify the Trix field should always display its content by calling the alwaysShow method on the field itself:
Trix::make('Biography')->alwaysShow(),
# Trix File Uploads
If you would like to allow users to drag-and-drop photos into the Trix field, chain the withFiles method onto the field's definition. When calling the withFiles method, you should pass the name of the filesystem disk (opens new window) that photos should be stored on:
use Laravel\Nova\Fields\Trix;

Trix::make('Biography')->withFiles('public'),
In addition, you should define two database tables to store pending and persisted Trix uploads. To do so, create a migration with the following table definitions:
Schema::create('nova_pending_trix_attachments', function (Blueprint $table) {
    $table->increments('id');
    $table->string('draft_id')->index();
    $table->string('attachment');
    $table->string('disk');
    $table->timestamps();
});

Schema::create('nova_trix_attachments', function (Blueprint $table) {
    $table->increments('id');
    $table->string('attachable_type');
    $table->unsignedInteger('attachable_id');
    $table->string('attachment');
    $table->string('disk');
    $table->string('url')->index();
    $table->timestamps();

    $table->index(['attachable_type', 'attachable_id']);
});
Finally, in your app/Console/Kernel.php file, you should register a daily job (opens new window) to prune any stale attachments from the pending attachments table and storage. Laravel Nova provides the job implementation needed to accomplish this:
use Laravel\Nova\Trix\PruneStaleAttachments;

$schedule->call(function () {
    (new PruneStaleAttachments)();
})->daily(),
# Vapor File Field
Vapor file fields provide convenience and compatibility for uploading files when deploying applications in a serverless environment using Laravel Vapor (opens new window):
use Laravel\Nova\Fields\VaporFile;

VaporFile::make('Document'),
When uploading a file using a VaporFile field, Nova will first generate a signed storage URL on Amazon S3. Nova will then upload the file directly to temporary storage in the Amazon S3 bucket. When the resource is saved, Nova will move the folder to permanent storage.
# Vapor Image Field
Vapor file fields provide convenience and compatibility for uploading image files when deploying applications in a serverless environment using Laravel Vapor (opens new window):
use Laravel\Nova\Fields\VaporImage;

VaporImage::make('Avatar'),
Vapor image files support many of the same methods available to Image fields.
File Fields
To learn more about defining file fields and handling uploads, check out the additional file field documentation.
# Computed Fields
In addition to displaying fields that are associated with columns in your database, Nova allows you to create "computed fields". Computed fields may be used to display computed values that are not associated with a database column. Since they are not associated with a database column, computed fields may not be sortable. These fields may be created by passing a callable (instead of a column name) as the second argument to the field's make method:
Text::make('Name', function () {
    return $this->first_name.' '.$this->last_name;
}),
Model Attribute Access
As you may have noticed in the example above, you may use $this to access the resource's underlying model attributes and relationships.
By default, Vue will escape the content of a computed field. If you need to render HTML content within the field, use the asHtml method:
Text::make('Status', function () {
    return view('partials.status', [
        'is_passing' => $this->isPassing(),
    ])->render();
})->asHtml(),
# Customization
# Readonly Fields
There are times where you may want to allow the user to only create and update certain fields on a resource. You can do this by using the readonly method on the field, which will disable the field's corresponding input:
Text::make('Email')->readonly(optional($this->resource)->trashed()),
You may also pass a Closure to the readonly method. It will receive the current NovaRequest as the first argument:
Text::make('Email')->readonly(function ($request) {
    return !$request->user()->isAdmin();
}),
If you only want to set the fields to readonly when creating or attaching resources, you may use the isCreateOrAttachRequest and isUpdateOrUpdateAttachedRequest methods from NovaRequest:
Text::make('Email')->readonly(function ($request) {
    return $request->isUpdateOrUpdateAttachedRequest();
}),
# Required Fields
By default, Nova will use a red asterisk to indicate a field is required:

Nova does this by looking for the required rules inside the field's validation rules to determine if it should show the required state. For example, a field with this definition would receive the required treatment:
Text::make('Email')->rules('required'),
However, you can also manually mark the field as required by passing a boolean to the required method on the field definition:
Text::make('Email')->required(true),
In addition, you may also pass a closure to the required method to determine if the field should be marked as required. The closure will receive an instance of NovaRequest, which you may use to define any complex logic which should be used to evaluate the field's required state:
Text::make('Email')->required(function ($request) {
    return $request->isUpdateOrUpdateAttachedRequest();
}),

Text::make('Email')->required(function ($request) {
    return $this->account_locked !== true;
}),
# Nullable Fields
By default, Nova attempts to store all fields with a value, however, there are times where you'd like to explicitly direct Nova to store a null value when the field is empty. To do this, you may use the nullable method on your field:
Text::make('Position')->nullable(),
You may also set which values should be interpreted as a null value using the nullValues method:
Text::make('Position')->nullable()->nullValues(['', '0', 'null']),

Text::make('Position')->nullable()->nullValues(function ($value) {
    return $value == '' || $value == 'null' || (int)$value === 0;
}),
# Field Help Text
If you would like to place "help" text beneath a field, you may use the help method:
Text::make('Tax Rate')->help(
    'The tax rate to be applied to the sale'
),
You may also use HTML when defining your help text:
Text::make('First Name')->help(
    '<a href="#">External Link</a>'
),

Text::make('Last Name')->help(
    view('partials.help-text', ['name' => $this->name])->render()
),
# Field Stacking
By default, Nova displays fields next to their labels, however some fields like "Code", "Markdown", and "Trix" may be better suited to a wider size. Fields can be stacked underneath their label using the stacked method:
Trix::make('Content')->stacked(),
# Field Text Alignment
You may change the text alignment of fields by using the textAlign method:
Text::make('Phone Number')->textAlign('left'),
The following alignments are valid:
leftcenterright
# Field Resolution / Formatting
The resolveUsing method allows you to customize how a field is formatted after it is retrieved from your database but before it is sent to the Nova front-end. This method accepts a callback which receives the raw value of the underlying database column:
Text::make('Name')->resolveUsing(function ($name) {
    return strtoupper($name);
}),
If you would like to customize how a field is formatted only when it is displayed on a resource's "index" or "detail" screen, you may use the displayUsing method. Like the resolveUsing method, this method accepts a single callback:
Text::make('Name')->displayUsing(function ($name) {
    return strtoupper($name);
}),